
Beyond the Code: Building this Site
A little behind the scenes look at why and how this site is built the way it is.
Quick Reminder: The complete source code for this site is available on GitHub.
I've had a personal website for a while, about a decade now, and over the years it has gone through several iterations, each reflecting my growth as a developer and the tools I had at my disposal. This is the latest one, celebrating the past decade I've spent paying domain renewal fees.
Previously
2015 - 2019
The first version of this site was much simpler, with static HTML pages and a PHP contact form. It was made around the time I started working with web development again (or arguably for the first time, if you set aside the Flash sites), after a couple of years working mostly on iOS apps.
2020 - 2025
Around the beginning of 2020 I found myself with some spare time and decided to rehaul the whole site, as it was already quite outdated at that point. I had just heard about this thing called Next.js, and I was eager to try it out.
I then made a sketch of what I wanted the site to look like, rolled up my sleeves and started building it. It was a great improvement over the previous version, though I didn't change much of the original site's structure, keeping the same four pages:
- Homepage
- Resume / Curriculum
- Portfolio
- Contact
Among the changes made in this version, the most important ones were the much improved design (which was mostly kept in the current version, as I still like it a lot), and the addition of dual-language support (English and Portuguese). I really liked how it turned out, but it being my first Next.js project, there were many things I would do differently if I'd ever rebuild it. Well... the day has come.
Present
Recently I was looking at this site again, and it felt like it was time for another update. I was still happy with the design, but I thought the code could be improved and modernized, and I also wanted to add some new features. So I sat down and listed my goals for the new version:
1. Add a Blog
It had to be easy to write and maintain, no fancy CMS, just something simple and integrated directly into the codebase.
You see, about a decade ago I had a site called Gambiarrando (which stands for "improvising solutions" in Portuguese). It was a simple WordPress site where I shared quick tech tips, did product reviews and wrote about pretty much anything else I thought could be useful to other people. Life happened, and by the time I moved to Canada, I wasn't finding time to keep it updated anymore, so I eventually took it down to save that couple of bucks I was paying for hosting.
Since then, I've missed having a space to share thoughts on the things I enjoy (and sometimes things I don't). And what better place to do that than on my own website, right?
2. Add a Store
I didn't want to make the site into an e-commerce, as that would be overkill, but I did want a section I could post some items I might be selling in the future, like a used laptop and things like that.
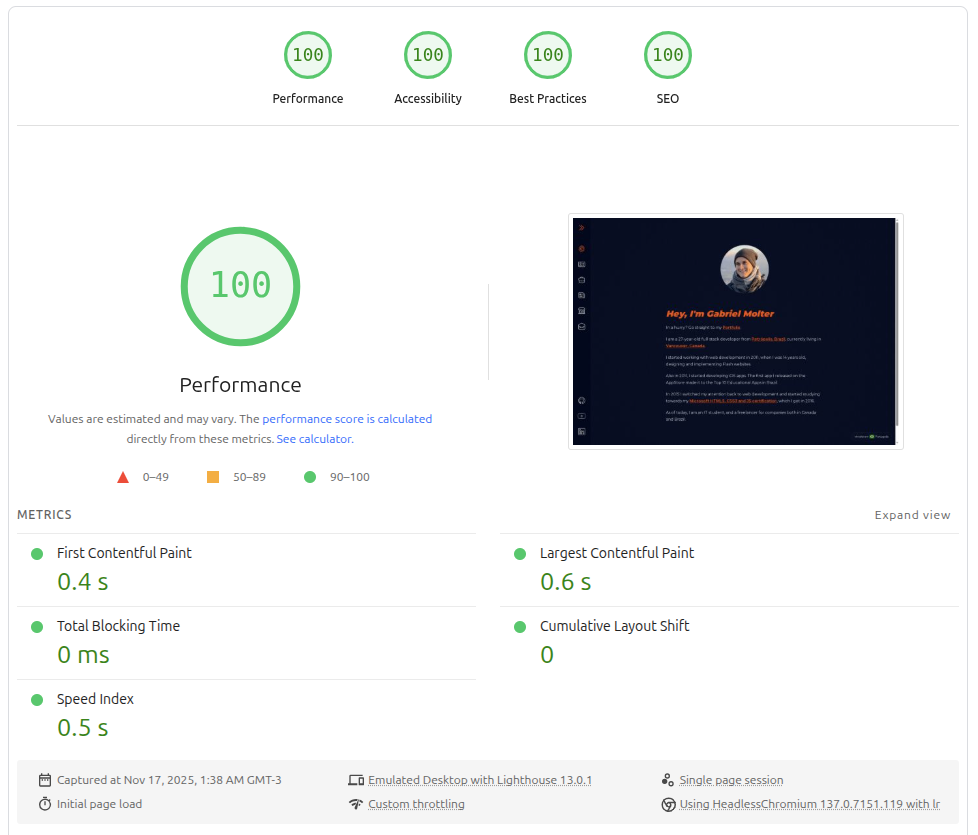
3. Perfect Performance
I was already pretty satisfied with the performance of the site, but it still wasn't perfect. My goal was to get a perfect Lighthouse score. And to achieve that, I wanted to have as much as I could of the site statically generated at build time.
4. Avoid anything that wasn't fully Open Source
I didn't want to rely on anything that wasn't open source and permissive licensed. Next.js itself is FOSS, but I also previously used FontAwesome icons (which are free, but require attribution), also Google Analytics and SendGrid to send emails. All of which I wanted to replace.
5. Update the tech stack to the tools I've been using recently
I've been using TypeScript and Tailwind for basically all my projects nowadays, and I didn't want this one to be any different. At this point I hadn't used Tailwind v4 yet, so it was also a great opportunity to try it out.
Development
So I had my game-plan ready. A Next.js site written in TypeScript, with Tailwind styles, Markdown for content, Icons from HeroIcons, nodemailer for sending emails using an SMTP server I could easily replace by changing a couple of environment variables, and Analytics from my self-hosted instance of Umami. It was time to build it.
I did run through a few challenges along the way, but nothing a few minutes of reading documentation couldn't solve. Making the markdown content work the way I wanted with multilingual support was probably the hardest part of it all, but I'm pretty happy with the setup I've ended up with and I feel I'll re-use it in future projects too.
Hosting & Deployment
While the site is currently deployed on Vercel, I made sure it's also fully portable for self-hosting. The features Vercel offers me (like their global CDN, deployment pipeline, etc) would be pretty time-consuming to replicate, and I probably wouldn't be able to do so for zero dollars, which is exactly what I currently pay Vercel, so I'll stay with them for now.
Future
I'm really proud of how this turned out. It's simple, performant, thoughtfully crafted, and built with tools I genuinely enjoy using. More than that, it's a platform I actually want to maintain and expand on, and hopefully not have the urge to rebuild it from scratch again in five years.
Thanks for reading through here, and may this post be the first of many I'll publish on this site. See you soon!